Showing posts with label DIY. Show all posts

Tuesday, July 26, 2011

A Little Window Inspiration

To kick off our Window Design Competition we thought we'd share how we put our windows together.  We started a new window yesterday by choosing a theme.  Typically our creative process begins with a theme or new product that inspires us. This window's theme is "Back to School"   ugh... I know.. that means summer is coming to an end, but don't worry, as a retailer we like to jump the gun a bit. Check out the pics below for the step by step example of building a window display.

We start with a blank canvas..empty window :)  This is also when we start googling our theme for inspirational images.  Like the one below
 We loved the stacked books.  After raiding Carmen's shelves we started stacking, creating different heights to keep things interesting.  We then added items from the store on top on the stacks and used them as display columns.
Next we added an old school desk to be the main vocal point of the window.  Not only does it match our theme but it creates a surface to display more store product.
At this point the main structure of the window is in place and it's time to select items to be featured in the window.  We also like to choose a color theme for our windows.  It makes it easier on the eye as well as suggest items that work well together in a customers home.  Everything in this window fit within the color palate of red, orange, and yellow.

 It's important to choose items that will be a variety of heights and textures.  If something isn't tall enough...improvise.. for example we placed an arrangement on top of a turned over trashcan that is also available for purchase. 
 
The final touch is adding a backdrop to our display. The backdrop is eye catching from a distance but also helps the items in the display stand out up close. Carmen also fit in well with our color palate, but she decided not to stay in the window :)
 These pictures were taking from inside the store looking at the back of our window display. Aren't the silhouette's amazing! I'd love to say we planned it but it was just a happy accident that it looks so great from the inside of the store too!

That's it! It's that easy! So get those window display ideas submitted so you can take a stab at it! Here are the details again on how to enter! Enter Our Contest!

Want to see the final look of our window?? You'll just have to stop by Main Street Florist! ;)
Joking!  Here it is.
Until next time!
The girls at MSF


Sunday, July 24, 2011

Design Our Window Competition!

We love our windows here at Main Street Florist.  It’s such a fun way to be creative and attract customers.  We want to include YOU in on the fun. Have you ever wanted to create a window display and show off your DIY skills?  Here’s your chance!


Submit a photo to Main Street Florist that best captures the theme of your window design to sarah@main-street-florist.com .  This could be an object, a place, color scheme, etc. The photo does not have to be taken by you, could be borrowed from online.  Then in 250 words or less describe your window design idea. Once all photos/ideas are submitted the voting will begin on facebook.  Your friends and family can vote  by “liking” Main Street Florist and commenting on your photo.  The winner will get to bring their vision to life at Main Street Florist between August and December according to the theme or season.

Photos are due by July 31st.  Contest voting begins on August. 1st. Voting will last until 12pm of August 7th.  Family and friends can vote once a day.  Submit your entry to sarah@main-street-florist.com

 Once the winner is chosen they will be given at $50 budget for supplies and materials outside of what we offer at Main Street Florist.  It is essential that your theme incorporate Main Street Florist product or be relative to the florist and gift industry.

Think you will need help setting up?  No worries we’ll be there to help make your visions a reality. Ready? Set? GO!!!! Send us those entries!


All Hail the Queen - a close up about Queen Anne's Lace

Welcome back, summer flower lovers! As you are driving around our beautiful rural area you can’t help but notices all the summer flowers in bloom along the side of the road. In particular, Queen Anne’s Lace… it’s everywhere! Before you just ignore it and drive on by, here are a few reasons why you should stop and respect the Queen ☺
Queen Anne’s Lace is essentially grown all over the world, although it is native to temperate regions in Europe and Asia. Here in Illinois, you might be as likely to find it cheerfully growing on the side of a freeway as you are in a formal English garden. A perennial favorite with flower consumers who feel it epitomizes the “wildflower” look, Queen Anne’s Lace is actually a form of wild carrot root (and if you cut the stem, you may notice that it has an earthy, carrot-like smell). As with so many flowers and plants, Queen Anne’s Lace was used by ancient Greeks and in Chinese culture for medicinal purposes. The crushed seeds from the flower were thought to be an effective form of birth control. Modern studies have indicated that the seeds do appear to interfere with both progesterone synthesis and ovum implantation. The use of Queen Anne’s Lace comes with heavy warnings for practitioners — the flower looks almost identical to a highly toxic little flower called hemlock!
Queen Anne’s Lace is ideal for casual summer decorating. You can simply gather a few stems into a wine bottle or mason jar or step it up a notch and use it as a wildly beautiful filler flower. So show us what you got! Here's your DIY challange for today.. go pick some Queen Anne's Lace and show us your arrangments! Post them to our facebook page!

Monday, July 11, 2011

Simple Centerpiece Class

Think you have what it takes to be a florist??  This past Sunday, Main Street Florist hosted it's first Simple Centerpiece class.  8 Students (we wish there could be more.. but right now our space can only hold 8) got to try their hands in creating their own arrangements in our shop.  The class was a blast! Much gratitude to all who participated. The class learned a little flower arranging 101 and got a step by step tutorial on how to create a few different styles of centerpieces. Check out the pics below of what you missed!


 If you are interested in attending a class at Main Street Florist please let us know! You can find upcoming classes here.  Also we love to keep you posted and get your feedback on Facebook so "Like" us by clicking here!


Sunday, June 26, 2011

Terrarium Class 6/23/11

So last Thursday night we hosted our first Make and Take Class! We had a small but mighty group.  It couldn't have gone better. 

Everyone in the class built their own Terrarium.  We provided the glass bubble bowls and all the tools/plants they needed.  These three above are roommates and they were a riot.  We later got a report back that they spent the rest of the evening fighting over the "perfect spot" for their new masterpieces in their apartment.
Chloe (an adorably spunky 1st grader), was our student expert on Terrariums.  I'm pretty sure at this point she was just giving her mom directions as she oversaw the landscaping project.


Cindy (pictured above) brought in this A-MAZING Terrarium container.  It was a perfect size and was stunning.  See the pics below of the finished product.


The whole gang with the Terrariums they built outside the shop.  We are still taking students for future classes this summer.  July 10th Simple Centerpieces 2-3pm and August 13th Mommy and Me Masterpieces 2-3pm More details here! Also if you interested in learning how to build your own Terrarium let us know.  Another class date may be in the works!


Wednesday, May 25, 2011

Summer Make and Take Classes

We are so excited to be offering classes this summer.  Check out the line up and sign up soon!

June 23rd
Build a Terrarium 6-7pm
Build your own eco-system in this fun and educational class. Join us for a little planting party with nibbles and drinks while making your own terrarium. We'll provide the glass containers and all the materials you'll need.

FEE: $35 to inlcude all supplies, $25 if you bring your own container
Register at by calling us at 217-854-8224. Space is limited.


July 10th
Simple Centerpieces 2-3pm

Learn to add your own personal flair to any setting with a few simple centerpieces. Three different arrangement styles will be demostrated. Participants will choose one to recreate on their own to take home. The take home centerpiece will be a $45 value.

FEE: $30 to inlcude all supplies
Register at by calling us at 217-854-8224. Space is limited.


August 13th
Mommy and Me Masterpieces 2-3pm
Bring the kids for a fun hands on workshop. Each child will make their own floral masterpiece to take home with the help of mommy or daddy! Don't worry, we'll be there to help too. This is a great opportunity to find a new creative outlet and learn the basics about flowers.

FEE: $25 for 1 child, $35 for 2 children to inlcude all supplies (and we might even throw in a free balloon or two)
Register at by calling us at 217-854-8224. Space is limited.

Wednesday, May 18, 2011

Bloomin' Rooms - Sweet Pea

Today for Bloomin' Rooms (trying out a new name for this topic... anyone have any other suggestions)  I brought home some simple Sweet Pea blossoms and a few left over Ranunculus pods.  I added them to my Arc Chive Vase.  Their richly colored flowers are smaller and simpler in form, but very fragrant.  I love it's clean simple look. I placed it near our TV to give us something a little more serene to look at.  So we've shown you ours... show your yours on our facebook page.  Where else in your home do you place fresh flowers?

Get This Look - Sweat Pea $2 per stem, Chive Arc Vase $13.99

Tuesday, May 17, 2011

Flowers @ Home

Here's is our next installment of our flowers at home! We really need a catching name for this topic....any ideas?  This time around we're checking out what Carmen is doing with flowers in her kitchen.     ~Sarah


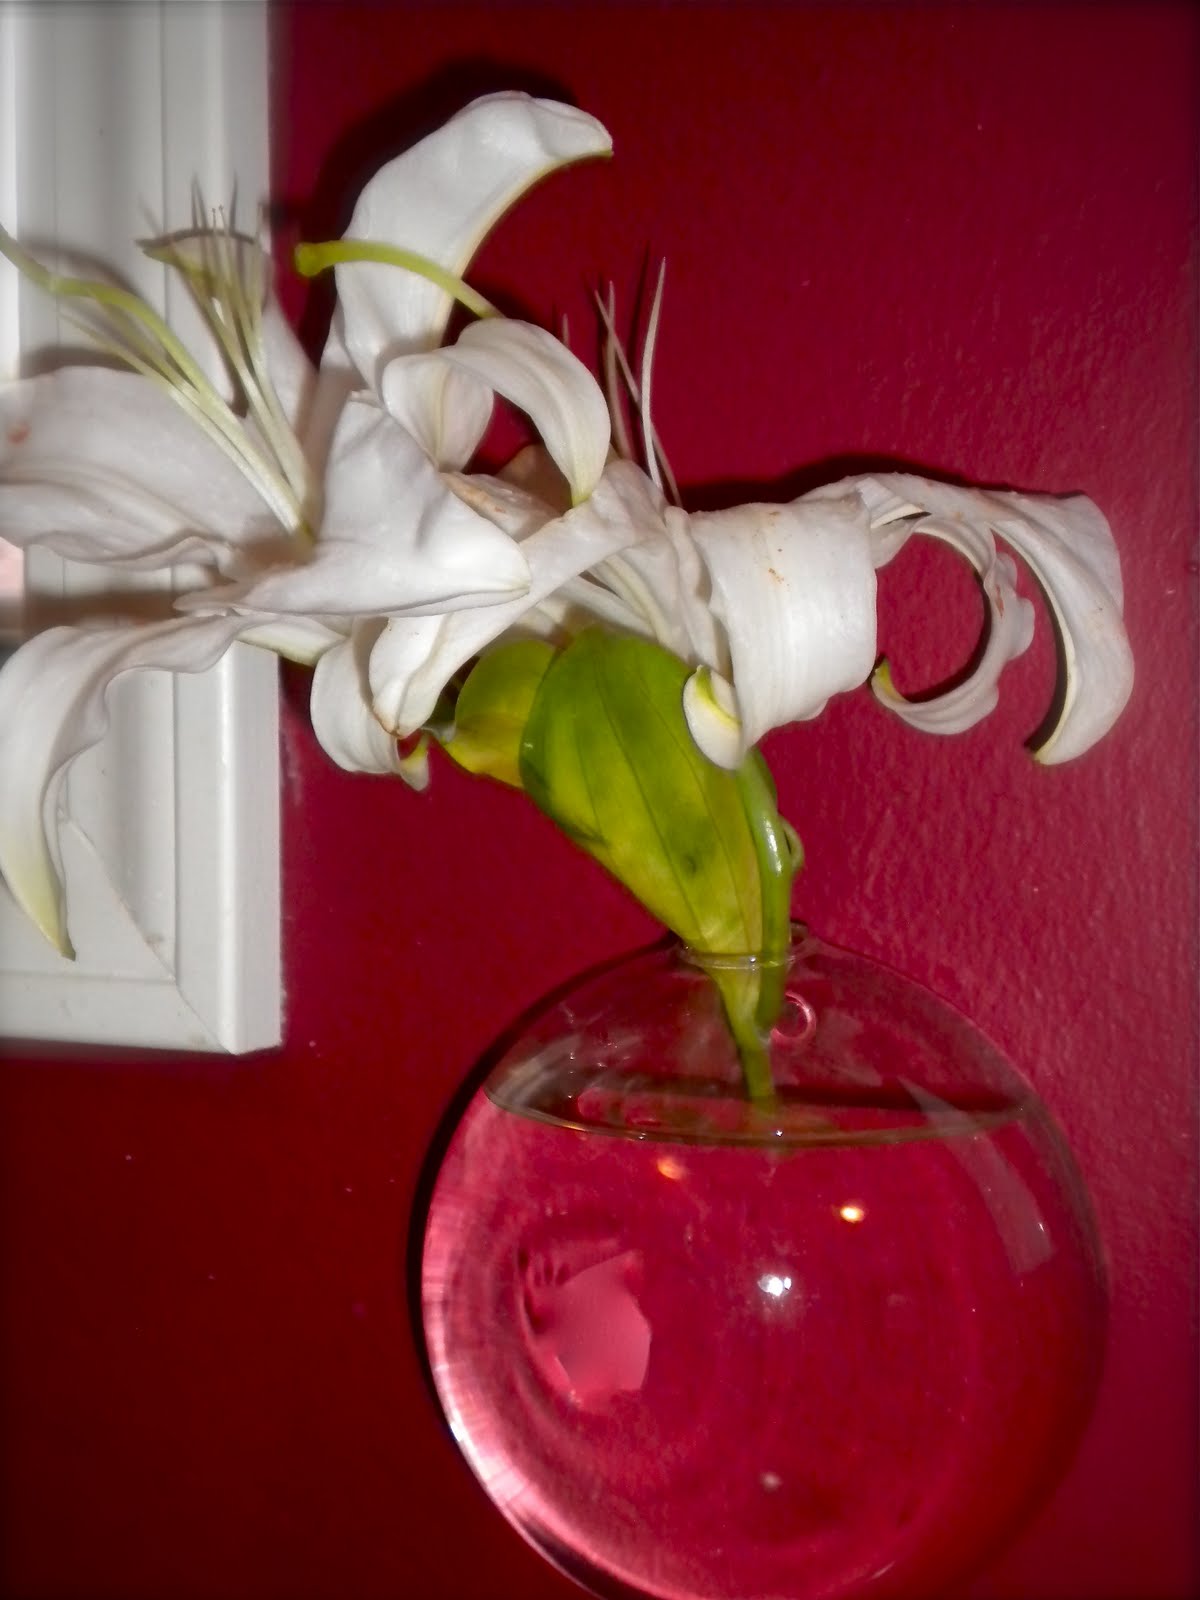
In my kitchen this week, I chose white Asiatic lilies to go in my Chive wall vases.  I chose the white lily because it was well proportioned for the vases and it accented my maroon walls nicely. In order to make the flowers last as long as possible, I made sure to remove the stamens as soon as the lily started to open.     

To get this look:  Chive bubble wall vase - $16.99 each
                            White lily (1 stem with 3 – 4 blooms) - $6
~Carmen

Wednesday, April 27, 2011

One would assume being new owners of a flower shop that Carmen and I would have flowers and cute decor all over our own homes.  Well... not so much :)  But that is going to change...

Carmen and I have been talking more and more about the amazing effect having just a few fresh flowers in your home can make.  So starting NOW we are practicing what we preach! So tonight I brought home some of our new cute vases and a few stems from the cooler. Once I got home, I played around with them a bit and took some pics.

Now.. I have to fess up... my initial thought was...bring a few things home... take a few pics... get them on the blog...talk about them.. and take them back to the shop. Well I can't now. I'm loving it way too much.  It really just adds that "pop" to a room and some sunshine on these dreary rainy days.  It can make a room feel fresh, inviting, and even inspiring! So.. ok enough gabbing.. I'll share my pics!

Chive Vase - $13.99  (3) Stems of Orange Ranunculus - $7.50

Ranunculus is such a simple and romantic flower with its paper like petals and rich layers. Just a few can go a long way in adding some character to your space.

~Sarah

Tuesday, April 26, 2011

Panorama Egg Vase

So it's a few days late (post Easter) but this item is so adorable I had to share it.. timely or not.  While stalking my favorite blogs today I stumbled across this beauty.

We like it Wild, featured on Design*Sponge created this miniature flower world out of an ostrich and a goose egg that they purchased with the insides already blown out. How crazy is that?!?! We love they're creativity...and they're name :) 

Check out all the details on how you can create your own  at Design*Sponge http://www.designspongeonline.com/2011/04/we-like-it-wild-panorama-egg-vase.html#ixzz1Kgd4s0Sb